
Web design is more than layouts and combining design elements that make web pages "pop." Behind any visually appealing and high-converting site is an optimized set of steps — a workflow.
Website design can be a complex process requiring meticulous planning. A web design workflow is a roadmap that takes all the team members' (and clients') creative design ideas into production and launch.
It’s a step-by-step guide to transforming a blank canvas into a stunning website — the plan that takes all those creative ideas in your head and brings them to life on the screen.
Here's the thing: Web design workflow looks different for various teams. And even web designers may have their own interpretation of a design workflow.
In this comprehensive guide, we'll walk you through what an optimal web design workflow looks like based on website design best practices.
Find out the crucial steps in a well-oiled workflow and discover how tools like BugHerd can make it more efficient.
Understanding Web Design Workflow
A web design workflow is a detailed plan that gets designers, alongside web development team members (including the client), on the same page with what needs to be done. It guides the team through the entire website design process — from start to finish.
What a web design workflow provides is structure. It plans the different stages of the web design process, including action points, task owners, outputs, and deadlines.
An optimized web design workflow goes a long way in terms of efficiency, consistency, quality, and time management. Here's how:
- It reduces the back-and-forth. By planning the details in each stage and following a checklist, designers, developers, agencies, and clients can reduce backtracking, errors, and lapses in judgment. They all follow a system and structure, so there are fewer chances of a misstep.
- It reduces errors and strengthens collaboration. The team can enjoy a seamless website design feedback loop because roles and responsibilities are clearly defined. Each stage clearly defines tasks and accountabilities within a set timeline. If this sounds like a stress-free way to work, you're not wrong.
- Everyone gets to work quicker and within timelines because of set project milestones and outputs. And by repeatedly following a process, the team creates a "muscle memory" of what needs to be done at each stage.
The Fundamental Phases of a Web Design Workflow
Not all web design workflows are created equal. While certain phases are fundamental to any workflow, here's how you can optimize yours so you can launch a high-converting website within budget and set timeframes:
Phase 1: Define Your Site Goals
This phase involves discovery. If you're an agency, you'll ask the client to fill up a website design brief and sit down with them to define the following:
- Key objectives and goals for the website: What's the website for? What's the purpose it's meant to serve? What are the goals, and how do they plan to measure these goals? How will the website help the company achieve its business objectives?
- Target audience: Who is the website for? Is the buyer persona clearly defined? What are their demographics, pain points, and aspirations? What's their online behavior, and which channels do they often use?
- Competitors: What are the competitors' value propositions? How do their websites look? Where can your website do better?
- Project scope and fees: Does the project include web design and development? Will this upgrade an existing site, or will you start from scratch? What are the website development costs?
- Calls to action: What are the desired calls to action? What does conversion look like? Will the CTA buttons encourage newsletter subscriptions, add to cart, or lead magnet downloads?
Aside from brief-taking, this stage involves heavy research on users and the industry.
Designers will dive deep and expand the customer persona, understanding their online preferences, behaviors, product reviews, what they say on social media, etc.
You’ll require market research that expands the client’s brief, including a study of the latest industry trends and more competitor audits
Phase 2: Turn the Ideas in Your Head into a Wireframe
Designers create the wireframe that serves as your website's blueprint. It provides a visual skeleton of each web page, reflecting the layout of various elements like images, text, videos, headings, and CTA buttons.
Early in the process, a wireframe describes the website's appearance. It gets everyone involved on the same page regarding its design and functionality.
An effective wireframe reflects vital UI and UX principles, such as information architecture (how you organize content) and visual hierarchy (guiding users' attention to the essential elements).
By creating a wireframe, your team can ensure that your website serves its purpose in a clean, visually appealing, and user-friendly way.
Here are the fundamental steps in creating a wireframe:
- Ideation: Conduct brainstorming and decide which website elements need to be included. Will it involve multiple pages or just one comprehensive landing page? Will it have a minimalist style or lots of interactive elements?
- Sketching: Create the layout, reflecting the brand personality, design style, features, and content.
- Finalize using tools: Add more details like buttons, images, videos, navigation, etc. Use tools like Figma or Balsamiq to replicate your team's vision into a digital version. Some tools offer real-time and on-page collaboration that streamlines website design feedback.
Phase 3: Turn Your Blank Canvas into a Stunning Website
This is where the rubber hits the road. Front- and back-end developers work simultaneously to turn the wireframe into a fully functioning website.
Front-end developers will dive into the code — HTML, CSS, or JavaScript — to build the site's skeleton, style, and interactivity.
Back-end developers will focus on the servers, setting up databases, and writing APIs using Python, Ruby, PHP, or Java.
It’s also at this phase when designers provide feedback to the devs. Is the website aligned nicely with your design? Or are they a few pixels they're out?
Content such as images, videos, and copy will then be added to the website's "body." When developing these contents, consider Search Engine Optimization (SEO):
- Images and videos should be optimized for web and mobile to ensure fast loading times, which can affect the site's technical SEO and searchability on search engines.
- Copy should be relevant to the target audience and address their questions, pain points, worries, and frustrations. In your sales pages, focus on more than just the features. Highlight the benefits and answer your web visitors' question: what's in it for me?
- Use keywords that will help the brand own the space it's in. Does the website talk about marketing consultancy? Then use keywords, meta descriptions, image alt, and internal and external links around marketing and the website owner's expertise.
- Content marketing shouldn't be an afterthought. As it helps drive traffic to the website, you should start building this up as early as the web development phase. Plan out blog topics, onboarding materials, and how-to guides to kick-start the site's SEO long game.
Phase 4: Squeeze As Much Feedback From the Team
Get internal feedback from website development team members, the client, and even those not involved in the project. Ask everyone in website development — including your client.
Get as much as you can about the things you want feedback on. Give guidelines for those providing it. Focus on a certain area like “What do you think about the gradient for this page?” or “Do you think the images tell the brand story?” We’ve made a guide on getting client feedback here.
Especially when you've seen the same pages a hundred times, it's key to get people's fresh eyes to identify potential issues and blind spots. Most importantly, involve the key decision-makers and get their approval.
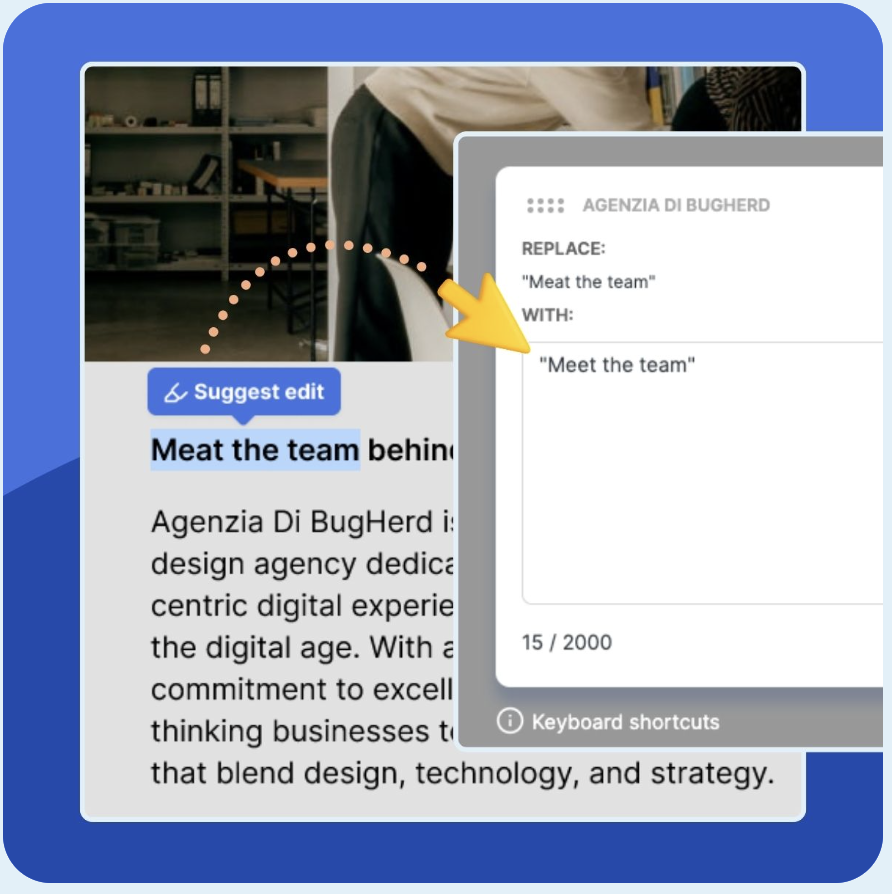
Use tools like BugHerd to streamline the feedback loop. BugHerd provides on-page and real-time visual feedback, giving technical and not-so-tech-savvy people context on their desired changes. Website feedback and annotation tools eliminate the back-and-forths.
But remember, knowing which feedback to take on board is a delicate balancing act. While opinions matter (and some voices are louder than others), staying true to the design vision and what's agreed upon during the wireframing and prototyping stage is also key.
The farther the adjustments get from the prototype, the more likely you'll open the project to a can of worms — and you might end up doing more revisions than necessary.
Phase 5: Test Your Website and Make Sure It Works as Expected
Before going live, you must ensure the website functions well and provides a smooth user experience. To find out, you need to test for technical and usability issues.
Here are ways you can conduct website testing:
- Technical testing: Check for coding errors, broken links, load times
- Usability testing: Focus on ease of use, navigation, mobile responsiveness, and overall user interaction
- A/B testing: Compare two versions of the same webpage. If your team needs to decide on design elements like color schemes, CTA buttons, headlines, placement of text, or buttons, this kind of testing gives you data on which performs better.
- Funnel testing: Understand the user's journey from landing on your website to completing the desired CTA. Are there any obstacles or "leaks" that could increase bounce rates?
- UX testing: Find out what the overall user experience is like and focus on accessibility, efficiency, and whether their navigation is how you planned it to be
Testing is only half the equation. Once you have the data and results from these tests, apply the changes and iterate to improve the website's overall performance. The key to iteration is it should be geared towards continuous improvement and thus shouldn't be a one-off task.
Phase 6: Launch the Website and Monitor the Performance
Now that your website has been tested, it's time to launch it!
But before deploying the site, define goals and Key Performance Indicators (KPIs) like increased website traffic and conversion rates, reduced bounce rates, longer page times, etc.
To measure these KPIs, ensure you've set up tools to monitor site performance, like Google Analytics (GA4) and Google Search Console. To monitor users' behavior on-site, consider installing tools like Hotjar that provide heatmaps and click maps. And if you need to integrate your website activity into your business workflows, connect it to your CRM like Salesforce or Hubspot.
Remember that maintaining a high-functioning website doesn't end with the launch. Keep optimizing your site's performance by:
- Ensuring the designs, images, videos, and layout remain aligned to the brand
- Improving website speed
- Fixing broken links
- Implementing effective CTAs
- Going full-steam on your SEO (both technical and content)
- Regularly updating your site's software
- Monitoring for potential security issues
Tips for Optimizing Your Web Design Workflow
As mentioned earlier in the piece, not all web design workflows are created equal. Some are more efficient than others.
So how can you optimize and streamline your workflow to achieve the best outcomes? Here are some actionable tips:
- Ensure clear communication. Establish open and regular communication across the web development team and between your agency and client. One way you can do this is to create a wireframe or prototype from a tool like Figma so everyone involved will see the visual concept. Use website design feedback tools like BugHerd for timely and contextual feedback.
- Integrate feedback, testing, and iteration throughout the process. Part of ensuring open communication is to welcome continuous feedback, testing, and iteration throughout the workflow. Don't leave feedback and testing until the end of the project. Embed them into the process to catch issues early and get data-based insights on design and usability. Keep iterating for continuous improvement.
- Don't shy away from project management tools. They facilitate efficient collaboration, task management, and progress monitoring. Client collaboration tools like Asana and Trello provide a central hub for team members to view the lineup of tasks, deadlines, and progress. They streamline project management and ensure that every task runs smoothly.
Optimize Your Web Design Workflow with BugHerd
An efficient design workflow ensures that everyone is on the same page, following the same process. Without it, the team will likely miss deadlines, overlook crucial details, go over the budget, and encounter miscommunication.
With an optimized workflow for web design, you’re more likely to produce consistent and high-quality designs, eventually launching a fully-functional website on time and within budget.
We hope this article has given you ideas on optimizing your web design workflow and how using tools like BugHerd can make your design process more efficient.
If you're about to start a web design project or in the middle of one, try BugHerd and see how it can make your team's workflow a well-oiled machine.

Merrin Hughes
Try BugHerd on your site
See feedback in context
Click anywhere to leave feedback directly on your website.


But don't just take our word for it.
BugHerd is loved by 10,000+ companies,
350,000+ users across 172 countries.
4.8/5
4.7/5
4.5/5
5/5
8.7/10
Sam Duncan 📱📏 🌱
@SamWPaquet
"@bugherd where have you been all my life??
We just migrated our bug tracking over from Asana and have at least halved our software testing time🪳👏📈. "
Ashley Groenveld
Project Manager
“I use BugHerd all day every day. It has sped up our implementation tenfold.”
Sasha Shevelev
Webcoda Co-founder
"Before Bugherd, clients would try to send screenshots with scribbles we couldn't decipher or dozens of emails with issues we were often unable to recreate."
Mark B
Developer
“A no-brainer purchase for any agency or development team.”
Kate L
Director of Operations
"Vital tool for our digital marketing agency.”
Paul Tegall
Delivery Manager
"Loving BugHerd! It's making collecting feedback from non-tech users so much easier."
Daniel Billingham
Senior Product Designer
“The ideal feedback and collaboration tool that supports the needs of clients, designers, project managers, and developers.”
Chris S
CEO & Creative Director
“Our clients LOVE it”
Emily VonSydow
Web Development Director
“BugHerd probably saves us
at least 3-4hrs per week.”